
Black Ops 6 - Citadelle des Morts
CitadelleMap
This guide is broken down into Chapters and Topics, a Chapter defines the content of the Topics to make all of the guides easier to navigate and read.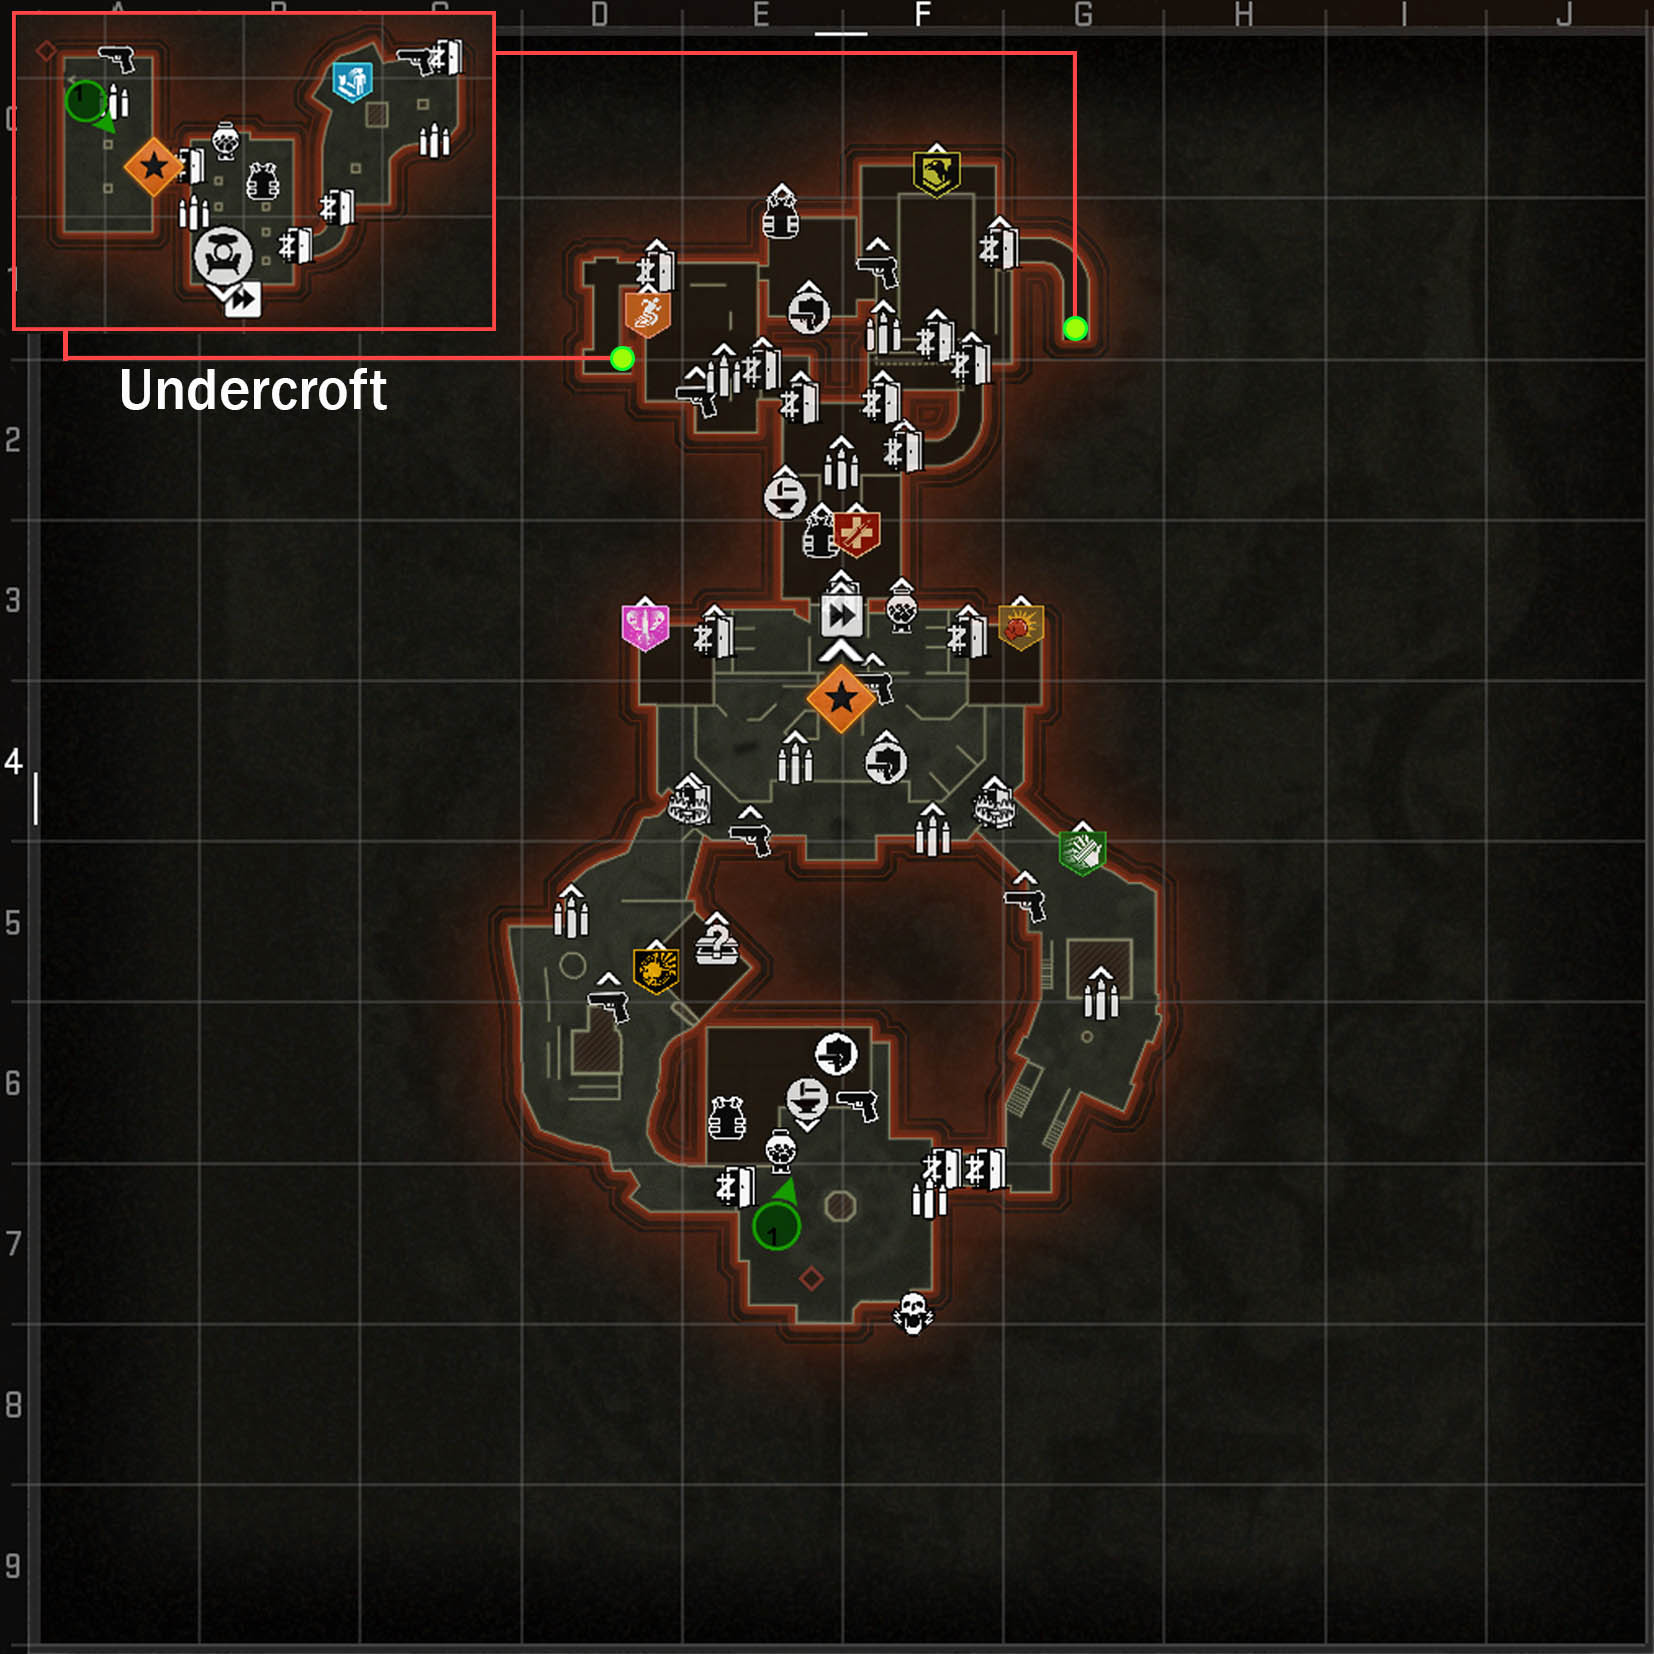
On
Walkthrough
Key Features
This is a walkthrough of the key features of the map, such as
1. Pack-a-Punch,Punch
Pack-a-Punch
- Reach the Oubliette Room
- Shoot the
threetwo locks on thecratecrate. - A

- crate with the Pack-a-Punch inside. Upon killing
the Doppleghast,it, it will drop a Blood AetheriumCrystal that needs to be collected.Crystal. Once collected, placePick the Crystalinside the portal. This will destroy the crateandactivateinteract with the Pack-a-Punch.Punch Machine to activate it.
2. Bastard Sword
- Activate the Pack-a-Punch
Starting at Round 10,a zombie sportingGet aGreatStampHelm will spawn
and will be immune to headshot damage. Killing it will dropfrom aStamp.HeadbucketA new zombie will spawn each round until all 4 Stamps are collected and used.Zombie- Use the Stamp on one of the four knight statues (
DragonDragon,Stag,Raven,
,Stag
,Raven
,Lion)Lion) inDiningtheHall (Vulture Aidroom)room to receive their respective Bastard Sword.
2.1. Caliburn (Fire)
PlaceBring the Dragon Bastard Swordin front ofto the Dragon statueat the top of the stairs in Entrance Hall
- 3
dotsbraziers willlitlight up onathestonemap,mapinteractabovewith one and go back to theDragonDragon.statue,Itindicatingwill damage you until you reach thelocation of three different cauldrons:Dragon.
OnOutside theHillsideCastleRamparts, between Melee Macchiato and the Rampart Cannon
NextAcrosstoDaiquirithe door between Upper Village (spawn) and Nature Path
InSpawnUpper Village (spawn)
Interacting with a cauldron will set you on fire, dealing damage overtime, but will grant a speed boost. Go back to the Dragon statue and interact with it. Zombies will spawn along the way, killing them will give health back.- Once all 3
cauldrons's flamesbraziers have beendepositieddone,in the Dragon statue, Caliburnyou willbereceiveavailable. Caliburn can be discarded by interacting with the Dragon Knight statue in Dining Hall.Caliburn.
2.2. Durendal (Electricity)
- Get the Stag Bastard Sword
rodsObtainGet 3LightinglightningRods:AFromzombie will spawn in the Dungeon
oncekilling aplayerKnightcarrying the Stag Bastard Sword enters the area. Killing the zombie will drop a lightning rod.ZombieUsing a gun with the Dead Wire ammo mod, or with a Shock Charge, hitShooting a fuse box
located on the right side of staircase in Upper Village leading to the castle.- Picking it up next to the Deadshot Daiquiri

Go to Hillside Ramparts and place the rods inside a vase

Onceuntil all threethe rods are charged,charged.
2.3. Balmung (Shadow)
- Get the Raven Bastard Sword
- Pickup the
AntiquityantiquefromFrom the AlchemyLab.
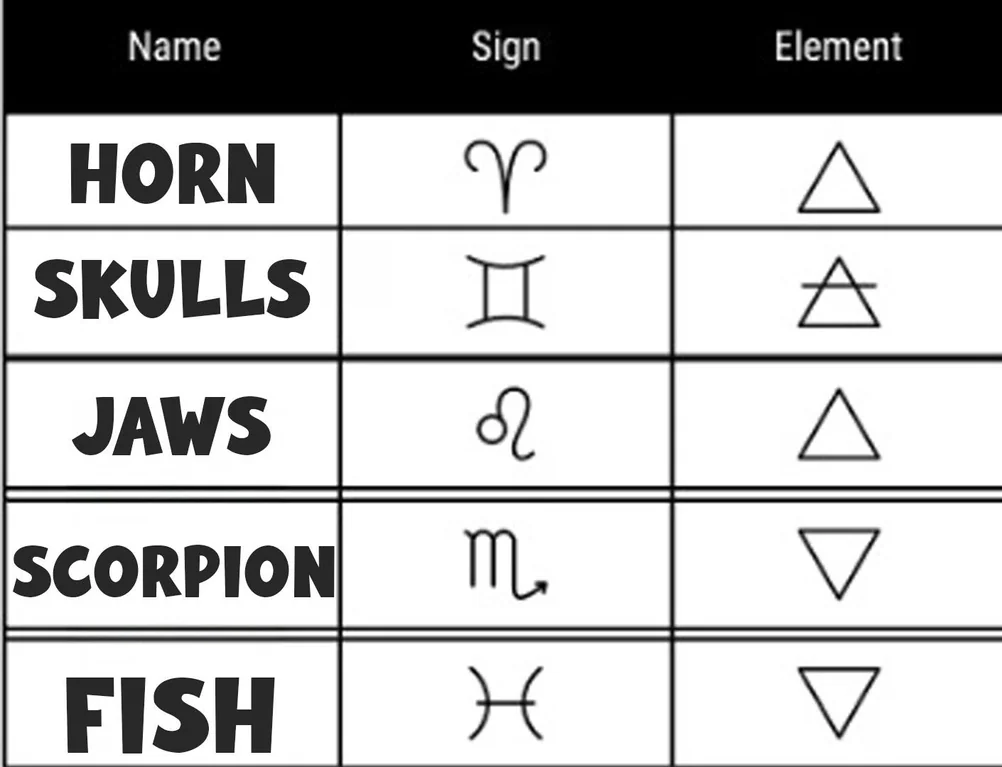
Lion Jaw (Panthera Leo)LabTwo-headedBringCrowtheSkullSwordandthe
(Corvus Corone)Ram/Urial Horn (Ovis Blanfordi)Fish/Mudskipper Fossil (Oxudercinae)Scorpion Fossil (Pandinus Imperator)
Travelantique to the bottom of the Tavern- Insert the antique and
interactthewithSword into thecircledevice on the wall
to place the sword and the Antiquity. - Interact with the device and
matchbased off which antique you have will determine the code-
symbol - Void orbswillspawnthefrom

device, andalchemicalatrianglevoidportalwillappear
aton thebottomground.ofStand near thedial.voidBelowportalsistoa table ofguide thecorresponding symbols and triangles for different Antiquity. -
The device will start ejectingvoid orbsthatintowillthem.followRepeatyou.thisAprocess two more times.- Place the Raven Sword in the new portal
will spawn onunderneath theground of the Tavern Cellar, guide 3 orbs into it. Once done, the portal will turn into an orb and move towards the Tavern turning back into a portal, repeat the process. The orb will move one more timedevice in the Tavernnext to the pool table. Once the last 3 void orbs have entered the portal, it will turn back into an orb and travel back to the dial in the Tavern Cellar. Interact with the dial, the Raven Bastard Sword will now be swallowed into a void portal and be turned into Balmung. Balmung can be discarded by interacting with the Raven Knight statue in Dining Hall.Basement.
2.4. Solais (Light)
- Get the Lion Bastard Sword.
- Glowing Parasites will
start tospawn. Killonea parasite to charge the sword then hit the doorwithnearby Speed Cola that has a lion knockeratattachedthetobottomitof the stairs in Upper Village
. This willto light up a symbol. Repeat the process three moretimes.times Interacttowithopen thedoor to teleport into a corridor.room.- Insert the sword in the
pedestalaltaratwhich will spawn symbols above it. Shoot theendcorrespondingofsymbols on thecorridor, four Alchemical symbols (☉ 🜔 🜍 🜹) will move aroundwall in theair.sameEachorder.symbolIfwilldoneshinecorrectly,inyou'llfrontreceiveof the pedestal one at a time starting from the top, showing the order they need to be shot at. Once the four symbols are shot in the correct order, Solais will become available to be picked up and you will be teleported back into the map. Solais can be discarded by interacting with the Lion Knight statue in Dining Hall.Solais.
3. Incantations/Rituals
3.1. Fire Incantation (Ankh)
/ Ankh
- Light 3
bonfires around the Hillside Ramparts.bonfires.
- Above Elemental
PopPopsroom
.room. - Above the entrance to the
Castle
.Castle. - Above Speed
Cola
.Cola.
- Once all 3 bonfires are lit a Doppelghast killing it will drop the Ankh.
- Bring the Ankh to the entrance of the Courtyard from Speed
Cola
,Cola, place it there, and fill it with souls. - Once filled, a chest will spawn. Meleeing this chest with Caliburn will open it, revealing the Fire Incantation.
3.2. Dark Incantation (/ Raven's Foot)
Foot
- Take the
Cave Slideslide from the Oubliette to the Town Square. Near the end, before you enter the sewer section, there will be a raven on theright
.right. Shootthe Raven. You can also do this from the exit of the Cave Slide, using an explosive to hitthe Raven. - The Raven will now be flying above the Town Square. Shoot the Raven again and it will drop the Raven's foot.
- Bring the raven's foot to the Undercroft, place it to the right of the mystery
box
,box, and fill it with souls. - Once filled, a chest will spawn. Meleeing this chest with Balmung will open it, revealing the Dark Incantation.
3.3. Light Incantation (/ Paladins Brooch)
Brooch
- Shoot the red crystal above
theVultureAid perk machine
;Aid; this will cause a red beam of light to reflect off the crystal. Continue this process until the beam is solid and reflecting off every crystal. - The crystals will reveal the Paladins Brooch resting on the bust in the
AlchemicalAlchemyLab
.Lab. - Bring the Paladin's brooch to the lion graffiti in the Dining
Hall
,Hall, place it there, and fill it with souls. - Once filled, a chest will spawn. Meleeing this chest with Solais will open it, revealing the Light Incantation.
3.4. Electric Incantation (/ Pegasus Horseshoe)
Horseshoe
- Shoot the horseshoe down in the
HilltopBarn and pick it up.
- Bring the horseshoe to the cannon and launch yourself out of it.
- Find where the horseshoe fell (there will be lightning clouds and storms)
either at the Hilltop or Village Square,head over to it and pick up the Pegasus Horseshoe. - Bring the Pegasus Horseshoe to the Town Square, Place it to the left of the
statue
,statue, and fill it with souls. - Once filled, a chest will spawn. Meleeing this chest with Durendal will open it, revealing the Electric Incantation.
Main4. Quest
Speak to Gabriel Krafft by interacting witha door in the Dungeon.
- Puzzle
Grab the 4 Torn Pages from the Sitting
Rooms.Room.TheReveal
specificSymbols:pages- Purchase
alwaysMeleespawnMacchiato. - In the water room, melee the far wall to reveal symbols.
willFind Vials:
- Locate six vials in the
samebargeneralarea.areaNote the numbers and symbols for each:- Bar counter corner.
- Table with a tablecloth.
- Room corner past the bar counter.
- Upstairs side table near the pool table.
- Red booth seats.
- Circle table near the bar entrance.
Shoot Symbols in Order:
- Use the numbers from the vials to shoot corresponding symbols in the water room (I–VI).
Complete the Step:
- This will spawn a red orb, then the book appears then deposit the four pages on the book.
- Match the symbols on the pages with the traps around the map. Get 10–15 kills in each trap to complete.
5. Final Steps
Solve the Staircase Symbols:
- Read the four symbols on the staircase (TOP, RIGHT, BOTTOM, LEFT) in the room to the left of the
roomswords.
everygame.Incantation
IfStatues:you- Grab the
followingincantationsteps,matchingnotethewhichsymbol. - Use
haveitwhichoneyethesymbolscorrespondingwithoutstatue.pickingInspectthemtheupsword (Double tap d-pad) andskiprepeattofor all symbols.
want to skip some ofpagesStepOrb6. Note that the 4thPlacement andfinal page will always correlate to the Point of Power trap in the Sitting Rooms.Kills:PagePlace1the-orbNearinboxesorbholdersaroundthesword:mapeachandtogetspecifickills
- Fire Sword: Castle entrance.
PageLion2Sword:-DeckNearoppositethe bunk beds
PageRaven3Sword:-WaterBy the TVs
PageLightning4Sword:-SpawnBy the torches near the stairwell
- Purchase
MeleeTake theoff-coloredOrbsquareback to the Staircase and place the orb on the wall and the wall will open. Then grab the guardian key.- Max shield, Tier 3 PAP weapon, Gobbles, Mutant Injections, and a bullet weapon.
- Use the Guardian Key to unlock the Golem at spawn.
- Start with shooting it in the
Undercroftbackthenattackit.glowingfinishareas.toUsecannontheInjectorMutant
In the Tavern, there are6 dark green flasks labeled 1 through 6 with Roman numerals1of 6
. Interacting with these flasks will reveal a blue symbol that matches one of the symbols on the wall in the Undercroft. Shoot the symbols in order from 1 through 6, but be careful not to shoot too fast, as the symbols change rapidly.Once the code is input correctly, a book will be revealed behind the wall to the left of where you input the symbols, with its pages torn out. Interacting with the book will cause the torn pages to be removed from your inventory and placed in the book.The pages in the book show four variations of red eyeballs, each corresponding to one of thePoint of Power traps around the map. Head to the 4 indicated traps in order, and activate them to get 10 kills, the symbol in the book will turn grey when completed. Once completed anorb slot with a code will spawn on the wall between the Sitting Room and the Oubliette
.Complete all 4 Elemental Swords and obtain all 4 Incantations.Once you have completed all four swords and Incantations, examine the code on the wall between the Sitting Room and the Oubliette. The code will consist of the symbols for the Bastard Sword/Knights, marked 1-4 in Roman numerals. This is the order in which you need to go to the Dining Hall and cast the corresponding Incantation on the knight while holding out their respective sword. Then, quickly inspect the sword while staring at the knight. Successfully doing this will cause the knight to salute at you. Repeat for each knight in the order displayed on the wall between the Sitting Room and the Oubliette.The knights will lower a white mystic orb you must bring this orb back to each ritual site and find the nearby holder inserting the mystic orb will let you start their respective elemental challenge
Prepare for Boss Fight:
Side Quests and Easter Eggs
Bartender
The first location is within the Stamin-Up room. Directly to the right of the couch (the ones sitting in front of the static TV) is a Meleeshelf, Macchiatoand punch,on revealingthe shelf should be a gridbottle.
The wallsecond requires a 6-symbol code, whichlocation is located in the Tavernbig in Town Square.
Challenge next to Raven's foot ritual; get kills with Balmung's charged attack, Void Incantation, or Shadow Rift ammo mod. (Kills with specific Aether Shroud augments may also count)Challenge next to Paladin's Brooch ritual; stand in giant green orbs? (still testing exactly what triggers the fill-up mechanic)Challenge next to Ra's Ankh; kills by letting zombies burn can be achieved with Caliburn, Molotovs, Fire Incantation, or Napalm burst ammo mod.Challenge next to Pegasus Horseshoe ritual; get kills with Durendal's charged attack, Electric Incantation, or Dead Wire ammo mod. (Kills on zombies affected by Shock Charges or the Tesla Storm field upgrade may also count)
Once you have completed all 4 elemental challenges with the Mystic Orb, place the orb at the wall between the Sitting Room and the Oubliette and it will fade, revealing a hiddenthrone room with thecorpseswords. In the corner of theowlroom, there should be a couch with a burnt body on it. To the side of it should be a table, anda mystic message. Activateon themessagefloor should be yet another bottle.The final location is in the room with the GPMG wallbuy. Somewhere in there should be a chessboard on a table, and
pickyetupagain,therightGuardian Key. You will need to bring the Guardian Keynext to thestatuetableinon theTownfloorSquare.shouldAtbetheanotherstatue'sbottle.feet, there is an eye symbol where you can deposit the message, allowing you to activate and enter the boss fight.
Side Quests and Easter Eggs
"Slave" Song
- On a table

On the groundHeadphone intheCourtyard
- On the ground near the couchin Undercroft

"Slave" by Kevin Sherwood and Vicky Psarakis
"Caliburn"Rat Song
King's - Crown
ObtainFind the
Caliburnwheelwonderofweapon.cheese Goin the glass display windows near the Tavern entrance. Find the rats at the following locations and scare them with a melee attack or firing your gun.Rat 1 - pizza van next toeachspawnRat 2 - next to tavern in spawnRat 3 - opposite deadshotRat 4 - stairs by cannonRat 5 - right of jug under chairRat 6 - under palette next to knightRat 7 - behind stone tablet by light incantationRat 8 - left of staminup under benchRat 9 - undercroft by a zombie spawnRat 10 - dungeon by quick res in a cellOnce all the rats are found go to the dish on the floor of the3PackcauldronsausedPunchinroom.theCaliburn quest and melee them with the Caliburn to reignite the flames on them.
Once all 3 cauldrons have been ignited, the song from the Caliburn quest will play.
Free Power-Ups
Around Citadelle des Morts, there are statues of various power-ups available for you to shoot. Once they have been shot, the corresponding power-up will appear at your location.
Locations as follows:
- Max Ammo -
Window-sillWindow at Upper Village
Full Power -Roof of Dining Hall
Insta-kill -On scaffolding above the Tavern (above the exit of the Cave Slide)
Max Armor -Inside the Entrance Hall, on the roof
Nuke -Above Elemental Pop room at the Hillside Ramparts
. You may be required to use an explosive to hit it.Bonus Points -Behind a couch in the Undercroft
Double Points -Inside a zombie spawn window in the Alchemical Lab
RatMap KingLocations
Obtain acheese wheel in a display window at Town Square
Go up to 10 rats around the map and stare at them to scare them away. Rat locations as follows:Town Square under a flower bed
Village Ascent under a van
Entrance Hall under a chair
Next to the Rampart Cannon under stairs
Dining Hall under a wooden pallet
Dungeon inside a cell
Alchemical Lab, under the stone showcasing elements
Alchemical Lab, under a table near bunk beds
Near Deadshot Daquiri, in front of a zombie spawn hole
Undercroft next to a Mystery Box location
Bring the wheel of cheese toa plate in the Undercroft
. The rats will eat the cheese and then leave.
Having at least 1 rat eat the cheese will drop various loot such as salvage, ammo mods, and weapon upgrade materials. If all 10 rats eat the cheese, loot will drop along with a golden crown

that your character will wear for the remainder of the match once picked up. Only 1 player in the match can wear the crown.
Fixing Lion Cannon
Activate the Rampart Cannon to open the castle gates.Find a Blowtorch and a GearBlowtorch is located in the Dining Hall to the right of the fireplace
Gear is located in Town Square in a fruit box
Chess Guardian
Find a white knight chess piece in one of 3 locations around the map:Under the Tavern on a shelf
On a table in the Dining Hall Passage
On a table across from Elemental Pop
Bring the chess piece to the chess board in the Sitting Rooms. Interact with the chessboard and an aethereal field will surround the table. Kill zombies within the field to fill it with souls.
Once the chess board is imbued with enough souls, the chess Guardian will spawn in and act as a protector for a limited number of rounds. The Guardian will only kill zombies, not revive downed players.
Mr. Peeks Free Perk
In the room with Elemental Pop in the Hillside Rampart, there isa window you are able to look through and see Mr. Peeks dancing above a blue orb.
This can only be seen from looking through this window. Shooting the orb with a bullet weapon will cause Mr. Peeks to laugh and disappear.In the Barn in the Nature Path, look through a hole in the Barn towards the castle
to find and shoot another Mr. Peeks dancing above a blue orb.From the 2nd floor of the Dining Hall, stand next to a flood light and look upwards at a window
. Find and shoot Mr. Peeks' orb again.Inside the Dungeon, Mr. Peeks will be sitting in a jail cell on a bed next to the Ammo Crate. Shoot the final orb and you will receive a free perk.
Bartending/Free PHD Flopper
Pick up 3 bottles of liquor around the map.Go to the Tavern and interact with thedrawers below the blue liquor
to start the bartending mini-game (You may be required to crouch to start the minigame).Play the bartending mini-game by interacting with liquor glasses at the bar and placing them in front of zombies that come up to the bar. The zombies will glow to show what color of liquor they want. Successful bartending will cause the zombies to leave you tips (points). After successfully bartending for long enough, any players participating in the mini-game will be granted the PHD Flopper perk.


If you have a glass of liquor of a color you don't want, interact with the trash can behind the bar

to rid of the currently held glass.
Maya's Revenge/Free GS45
Start a match playing as theMayaoperatorStarting on round 12, go up tothis door and interact with the radio
The player who is Maya can go up to the door and enter a wave defense in a hallway. Survive the wave defense against zombies and Doppleghasts.Once the wave defense is done, interact with a door in the hallway to watch a story cutscene. Once the cutscene finishes, the player who is Maya will appear outside the first door, and a legendary-tier GS45 will be on the table next to the radio.
Chaos Incantation Defense
FinishStep 5of theMain Quest.Once all of the symbols of the Chaos code wall have dimmed, use one of each Incantation on the wall to light up a row of symbols.Once all of the symbols are once again active, a lockdown defense will initiate in the room. Survive 3 waves against zombies.
Once the lockdown has completed, various loot will appear in the room for you to pick up.
Fireplace Wisps
Throw Molotovs at the following fireplaces in rapid succession, failing to do so within a specific time limit will cause the fires to go out.


Once all 4 have been lit in succession, flaming wisps will fly out of the fire places, killing zombies they come across. This can be repeated multiple times a game.
Free Pool Table Points
Like in Terminus and Liberty Falls, Shooting the pool balls in the Tavern

will cause all balls to sink, dropping 100 points.
Wishing Well Bank
The following steps are not verified and may be slightly off.
Throwing 4(?) Frag Grenades into the well in the Village Square on a Pest round will cause it to spew out point drops. After doing so, you are able to interact with the well and deposit points into it. The points can be reobtained by throwing another Frag into it. This can work with Double Points and double the amount of points you pick up from the surplus in the well.
Map Features Locations
Wall-Buy Locations
| Weapon/Item | Location |
|---|---|
| GS45 | Town Square |
| XM4 | Village Ascent |
| AS VAL | Courtyard |
| Kompakt 92 | Hilltop |
| LR 7.62 | Hillside Ramparts |
| Tanto .22 | Dining Hall |
| Marine SP | Sitting Rooms |
| GPMG-7 | Undercroft |
| KSV | Dungeon |
Perk Locations
Trap Locations
      | ||
Fast Travel Locations
Arsenal Locations
- TBD
Trap Locations
- TBD
Arsenal Locations
- TBD